Deceptively Decadent Brownies

Decadent healthy brownies. Which word does not belong? The answer is that they all belong, because there really is such thing as a decadent yet healthy brownie! Don’t believe me? Well, the proof is in the pudding… I mean batter.IMG_3508

It took many tries, but I finally perfected a recipe for the perfect brownies. I sacrificed myself as a brownie taste tester, and had to eat upwards of six different brownies and batters- what a rough life! It ended in triumph though, as this recipe was crowned the winner of the best brownie… possibly ever.

The best part about these brownies? They’re also secretly healthy, or at least healthier than most other brownie recipes floating around the inter web. How? Well first of all, they’re vegan so they’re not chock-full of artery-clogging, high calorie butter. Second of all, they have a healthy secret ingredient in them. Hint: it’s a ~trendy~ leafy green. If you guessed kale, you win a virtual brownie!IMG_3503

Yes, kale brownies. Am I crazy for creating these? Only slightly. I promise they don’t taste like kale though. Seriously. They just taste like gooey, cakey, chocolatey goodness. I got the idea of sticking veggies into dessert from the cookbook Deceptively Delicious by Jessica Seinfeld. The whole point of the cookbook is to encourage parents to sneak veggies into their kids’ diets, and you already know I love it. Anyone who likes desert but is trying to be a little healthier, or wants an excuse to eat more brownies, will love this recipe. They’re “healthy,” so you can eat more of them- right?!

FYI, these brownies are definitely more cakey than crunchy or chewy- they’re pretty tall and thick. That just means there’s more to love! But if you’re a fan of a very crunchy, chewy, crackly-topped brownie than these might not be for you. I encourage everyone to give them a try though, because why not be a little insane and sneak some vegetables into brownies?IMG_3504

Deceptively Decadent Brownies

Makes 16 brownies

  • 2 cups flour
  • 2 cups sugar
  • 3/4 cup cocoa powder
  • 1 teaspoon salt
  • 1 teaspoon baking powder
  • 1 teaspoon vanilla
  • ½ cup oil (canola or vegetable)
  • ½ cup applesauce
  • 1 cup KALE WATER*
  • ½ cup chocolate chips, optional

1. Preheat the oven to 350 degrees Fahrenheit.

2. First make the kale water* by combining ½ cup water and 1 cup raw kale in a blender and blending on high for a minute, or until the kale is completely blended.

DSC_0028

3. Mix together the dry ingredients, from flour to baking powder.

4. Add in the wet ingredients, aka the rest of the ingredients including the kale water. Mix until just combined and add in a ½ cup of chocolate chips.

DSC_0049

5. Pour into an 9″ X 9″ oiled brownie pan and bake for 35 minutes, or until a toothpick comes out clean when inserted into the brownies. Let cool for like 15 minutes, then cut and enjoy!

DSC_0126

Give these a try and let me know how you like them! Take a picture and tag me @peanutbutterandle on Instagram or email it to me at peanutbutterandle@gmail.com.

And lastly, how do you feel about sneaking vegetables into desserts? Do you like it, or are you offended at even the idea of it?

screen-shot-2016-09-30-at-12-38-30-am

What I’ve Been Eating in College (Collab)

Happy Monday!

I can’t believe that today marks the beginning of my FOURTH week of college. I’ve been here for almost a month already! How insane is that?!

Today I thought it’d be fun to share with you WHAT exactly I’ve been eating since I’ve been in college and am no longer cooking my own mealsdsc_0022

This post is a collaboration with my friend Stephanie of “Hello Sesame” aka like the cutest lifestyle blog EVER.

Stephanie and I met this spring on Instagram of all places after she commented on one of my posts and we found out that she watched me play against her friends at high school tennis regionals (awkward)! We also found out that we go to the same college, and we immediately connected over our blogs and our love of food/ tennis/ our college!! It turns out that she also lived in the same dorm freshman year that I’m living in now and we played on rival tennis teams (but possibly played in the same group tennis lessons). WHAT a small world. Stephanie and I have been messaging on Instagram since May, and earlier this month she suggested we finally meet up in real life. We decided to go all out and do a blog post together too!

Stephanie and I met up this past Friday for dinner at the dining hall next to my dorm and had fun taking pictures of and eating dorm food (while people sitting by us hard-core judged us for being basic and taking pictures of our food).

dsc_0015

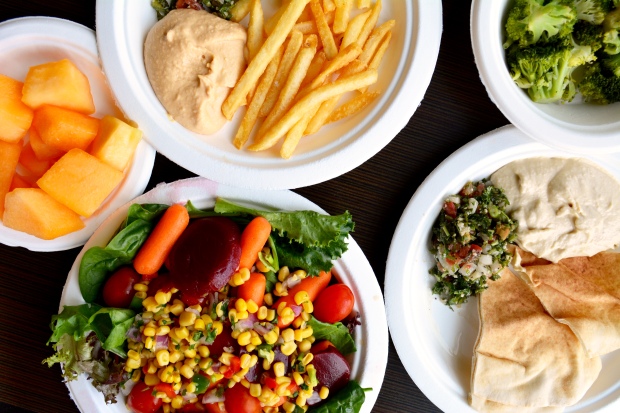
For dinner, Stephanie got fries, hummus, tabbouleh, cantaloupe, and cooked broccoli. I got a giant salad (mixed greens, baby carrots, cherry tomatoes, cooked beets, & a corn medley) and hummus, tabbouleh, and quinoa. What I like about the cafeteria we went to was that they have a “mediterranean” section every day with pita, hummus, tabbouleh, and quinoa.

dsc_0001

I live next to the “healthiest” cafeteria on campus, so that’s great. I’m not sure it’s the healthiest caf, but it does have a decent amount of salad and fruit. Every dining hall has menus each day that show dietary labels, so I can easily stay vegan as long as I stick to the certified vegan options. I’ve been eating a LOT of salad and fruit, which I like… we’ll see how I feel though once winter comes and all I’ll want will be ALL THE CARBS.

I’ve stayed vegan since I’ve been at college- it’s actually been pretty easy thanks to the dining hall selections! I eat every meal in the dining hall, unless I wake up late and miss part of my class so I have to literally jump out of my (lofted) bed and grab a Lärabar to eat as I bike to class… not that that’s happened or anything. 😉

For breakfast, I eat…

  1. cereal with soy milk or almond milk (right now I’m obsessed with Kashi Go Lean Crunch) and fruit
  2. oatmeal with peanut butter and banana slices mixed into it
  3. Silk nondairy yogurt and MSU baker’s granola (picture #3)

screen-shot-2016-09-18-at-11-36-42-pm

Typically we eat out of real bowls with real silverware but lately we’ve been using disposable plates and utensils because the caf is understaffed and has no one to do dishes.

For lunch, I eat fruit and…

  1. salad: my go-to is hummus with spinach, carrots, raw broccoli, cherry tomatoes, beets, and chickpeas
  2. fries [sometimes]
  3. rice and stir-fried veggies (when it’s served)
  4. quinoa, an apple with peanut butter, and carrots
  5. hummus, tabbouleh, carrots, and pita
  6. the soup of the day if it’s vegan. Today it was a hearty lentil stew that was pretty good (lentils, rice, veggies, and a little bit of broth). I’ve also had tomato wild rice soup and spicy Mexican tortilla soup.img_4332img_4335

Lunch from a few days ago: I got a salad with spinach, hummus, green beans, and carrots + grapes + spicy mexican soup + french fries. My friend Emily got mashed potatoes and gravy, spicy soup, fries, hummus, pita, and tabbouleh. 

I eat basically the same food as lunch for dinner.

A few days ago I had a super good tofu/ snap pea/ mushroom/ soy sauce stir-fry with quinoa and steamed cauliflower though!

dsc_0030

Snack-wise, I eat fruit from the caf or enjoy an afternoon pick-me-up in my room of chai tea and chocolate chips.

There are no vegan dessert options which is TRAGIC but hey, at least I won’t gain the freshman fifteen because of dessert??

However, a few days ago I made cookies in my microwave so I could have dessert (recipe will be on the blog later this week). Plus, some of my friends’ dorms have community kitchens that I can bake in… so I’ll get dessert somehow eventually. As of right now I’ve just been eating chocolate in my room (what’s new).

dsc_0202

So there’s what I’ve been eating! What have YOU been eating (whether you’re in college or not!)? I’m feeling pretty healthy and don’t think I’ve gained any weight because of all the exercise I’m doing, from walking around campus to biking to classes to running with the running club.


I’m so happy I got to collaborate on this post with Stephanie- be SURE to check out what she eats in college!! Her post will be a little different than mine because she lives in a house with a kitchen and can therefore make her own food.

Have a wonderful start to your week!

xx Ellie

Lavender Lemon Bread

lemonlavenderbreadRemember that lavender recipe I promised you last week? Well here it is!

My mom and I purchased some cooking lavender to bake with when we road tripped to a lavender farm earlier this summer.100_8603When we were at the farm, my mom got lemon lavender ice cream. She said it was super refreshing, and that ice cream inspired us to make this similarly flavored bread together. It’s a sweet, refreshing bread that’s perfect for a sugary breakfast or an afternoon pick-me-up snack. I hope you love it as much as we did!img_3581

img_3574Lemon Lavender Bread

Makes 3 mini loaves or one large loaf

Inspired by this recipe

For the bread:

  • 2 cups all purpose flour
  • 1 cup sugar
  • 2 teaspoons baking powder
  • ½ teaspoon salt
  • 1 flax egg (1 Tbsp flax seed meal + 3 Tbsp warm water)
  • 1 cup non-dairy milk
  • 1/4 cup oil
  • 4 tablespoons lemon juice
  • 2 Tbsp lemon zest
  • 2 teaspoons dried lavender

For the glaze:

  • 1 cup powdered sugar
  • 3 to 4 teaspoons lemon juice
  • 1 tablespoon water
  • 1 tablespoon lemon zest (zest from one small lemon)

Instructions:

  1. Preheat the oven to 350 degrees F.
  2. Make the flax egg by combining the flax seed meal and water in a small bowl. Mix it together, cover it, and put it in the fridge for about 15 minutes to help it conglomerate.
  3. Whisk together the dry ingredients (flour, sugar, baking powder, salt) to a large bowl.
  4. Add in the milk, oil, and lemon juice to the dry mixture and whisk until just combined.
  5. Add in the flax egg and whisk until combined.
  6. Mix in the lemon zest and lavender.
  7. Oil the bottom and sides of mini bread pans.
  8. Pour each bread pan 2/3s full with batter.
  9. Bake the loaves for 35 to 40 minutes, depending on how hot your oven gets.
  10. Let the bread cool for about an hour after taking it out of the oven before topping it with glaze.
  11. For the glaze: Whisk the powdered sugar, lemon juice, water, and lemon zest together in a small bowl until smooth. Then drizzle the glaze over each loaf and ENJOY!

Enjoy the last week or two of summer (in name only, unfortunately) and enjoy this lemon bread!

xx Ellie

Chicago Recap (part 2)

IMG_2721.jpg

Welcome to part two of my Chicago trip recap! PLEASE read part 1 of the trip HERE before continuing so you get the whole trip lowdown! PART 2:

Saturday: 

Today was the day that my friend Emily and I didn’t eat “real” (healthy) food for 24 hours. Because we’re almost adults and we can eat what we want! I woke up and worked out in the hotel gym, then Emily and I sauntered over to Do-Rite Donuts. I got their only vegan donutlemon, and it was better than I expected! It was a baked donut, so it tasted like lemon cake.

We worked off our donuts afterwards by walking to the Maggie Daley Children’s Park, where we climbed up towers and slid down slides like the five year olds we are at heart.

After that excursion, we ambled along the shoreline to Navy Pier, where we people-watched and enjoyed Ben & Jerry’s from the scoop shop. I got their VEGAN flavor, Peanut Butter & Cookies! It was to-die-for.

After that excursion, we walked back to Millenium Park and Emily saw “the bean” for the first time, a Chicago landmark and mirrored statue in the shape of a bean. After we finished being touristy, we decided to shop some more and get a snack. I tried matcha iced tea for the first time at Argo Tea, which was quite refreshing.

Then we found dinner at a pizza place called Bar Toma that Emily heard was good. I asked if they had vegan options, and they said they could make their pizzas vegan by omitting the cheese on top. We split a small spinach & garlic pizza, but got half of it with cooked brussels sprout shavings instead of cheese for me.

IMG_2656The pizza was basically crust, a lemon zest/ garlic/ oil sauce, spinach, and brussels sprouts/ cheese. It was okay- it needed a lot more sauce. It was just what I needed at the time though, since before dinner I’d only eaten sweets the entire day. I literally hadn’t eaten a “healthy” meal since dinner the night before, which is a record for me! 

After dinner, we walked back to our hotel and collapsed into bed. We walked a lot throughout the day- like 12 or more miles!

IMG_2611

One of the attractions we walked past was the beautiful Chicago river!

Sunday:

Sunday was the day I was most looking forward to throughout the trip, and it did not disappoint. I started the day with a workout, and then we walked over to Meli Café for brunch. I chose Meli because it had a full-page vegan menu, as well as many non-vegan items for Emily. I decided on the carrot coconut pancakes, which turned out to be fluffy, fresh, and cinnamon-y cakes of delight.

IMG_3161

After breakfast we went to the hotel, packed up our stuff, and went to Lolla. As soon as we got into the festival on Sunday, we high-tailed it to see all the bands below…

  • Låpsley– highlights were “Operator” and “Hurt Me.” She was okay live- there was a lot of technology involved in her performance (like a voice changer) which I didn’t like. Em and I were in the third row for this show which was cool.
  • Oh Wonder (OW), aka the most WONDERful band ever (see what I did there?)- highlights were “Dazzle,” “Without You,” “Landslide,” and “Technicolour Beat…” but I love all of their songs! Can you tell OW is my favorite band? This was my second time seeing them live. While they were amazing as always, I liked the first time I saw them better just because I was closer (third row!) and there was a talkback after the concert. Give them a listen because I love them- plus they are such cute and nice people.

After this we got food. Em got a lot of ice cream and I got a popsicle for lunch. When in Chicago, right?

FullSizeRender-2

  • We stumbled upon the tail end of Marian Hill and I immediately liked them. So good, so soulful, and so much saxophone. 😉 Highlight was “I Want You.” I recommend listening to the duo when you’re feeling funky.
  • Years & Years– another band we stumbled upon that I fell in love with. SUCH a fun concert with such great, soulful, poppy music! I recommend listening to “Desire” if you’re feeling upbeat or “Eyes Shut” if you want a slower song.
  • Halsey– I love Halsey’s music, so I loved this concert! She was fabulous live. Highlights include “Castle,” “Hold Me Down,” and “Blue.”
  • AURORA– I first discovered AURORA this winter, and have loved her ethereal, upbeat music ever since. I was so excited that I got to see her live since she lives in Norway. Song highlights include “Running with the Wolves” and “Conquerer.”

Dinner time! Emily got deep dish pizza and I got a SPICY black bean tamale and an apple.

IMG_2743

  • Flume (a famous DJ)- this concert was okay- I wouldn’t call it a true concert though because he (Flume) wasn’t singing! He was just DJ-ing with his computer. I like live music with actual singers much better. The music was fun to dance to, though.
  • Ellie Goulding– aka possibly my favorite concert I went to at Lolla. She was AMAZING LIVE- OMG. I liked her before seeing her thanks to hearing some of her more famous songs on the radio, but now I know more of her songs and LOVE her music and and her (did you know she’s vegan?)! I am proud to share my name with her. 😉 Song highlights for Ellie’s concert were “Army,” “Don’t Panic,” and “Aftertaste.”

After Lolla, we walked back to the hotel, ate some food, and went to bed. An overall good day.

Monday:

IMG_2759

I got the only vegan donut from Stan’s Donuts and it was SO DANG GOOD. It was a yeast-raised ring topped with granulated sugar and it tasted like a Krsipy Kreme Donut. 

Monday morning I worked out (surprise), we packed up, ate donuts from Stan’s Donuts, and drove back up north with Emily’s mom.

xx Ellie

Chickpea “Tuna” Bowl

This fresh chickpea “tuna” bowl is one of my favorite summer lunches.

It’s so easy to make, it only takes like five minutes to make, has five ingredients, AND it’s protein-packed. Plus it’s yummy… but it wouldn’t be on the blog if it wasn’t! It’s packed with some of my favorite ingredients: chickpeas, celery, and fresh tomatoes (from work!).

100_8859

Believe it or not, tomorrow is my last day working at the hydroponic tomato hut. Say what!? Where did the summer go?

I have mixed feelings about my last day of picking tomatoes. On one hand, it’ll be nice to be done with work for the summer. Plus, I won’t get so dirty ever again- that is, unless I work there again next summer, which IS a possibility.

IMG_0650

Seriously, look at how dirty I get.By the end of my 9 AM to 3 PM shift, I’m covered in dirt, pollen, and tomato flowers!

On the other hand, it means summer is almost over. Which stinks because summer is my absolute favorite season. Also, I won’t be picking any more tomatoes which means I won’t get to bring any more tomatoes home. I’m seriously going to go through fresh tomato withdrawal. Which is why it’s a good thing that the cherry tomatoes from my garden are ready- at least I’ll have those to eat!

Other than working at the tomato hut, I babysat a lot this summer. Boy do I have stories to tell about that. One boy I sat for almost shocked his dog to death with a shock collar that his grandmother gave to him to use, and another family I babysit for had to come to my rescue with putting a stop to it while we were out on a walk. By the end of the night, I wanted to cry. Mostly for the poor dog who was probably in a lot of pain. That’s the worst thing that happened though, besides having to babysit six kids by myself multiple times (HARD work). Other than that, babysitting this summer consisted of lots of beach days, trips to the candy & ice cream store, and outside playtime. Fun stuff.

Within the next week I’ll be posting some snapshots from my summer for you! 

IMG_3610

But before then, let’s all enjoy this chickpea “tuna” bowl. Because it’s summer, and it’s nice out so you don’t want to spend a lot of time inside preparing food, and there’s a lot of fresh produce to use.

Chickpea “Tuna” Bowl

Serves 2

  • 1 can chickpeas, drained and rinsed
  • 1 Tbsp Vegenaise (or other vegan mayonnaise)
  • 2 celery stalks, washed and sliced into ½ inch pieces
  • 1/4 tsp coarse seasoning salt
  • 2 tomatoes, optional but recommended

Instructions:

  1. Drain and rinse the chickpeas, then add them to a large bowl.
  2. Mix in the Vegenaise.
  3. Smash the chickpea mixture with a fork (so it looks more like tuna).
  4. Chop the celery then add it into the mixture.
  5. Either serve “as is” in bowls or on bread as a sandwich OR add in tomato and serve in bowls. OR you can hollow out the tomato as a bowl and spoon the chickpea mixture into it. YUM.

Happy end-of-summer!

xx Ellie

Rhuberry Muffins

Happy Wednesday! How are you? What are you up to? I’m back at my cottage (aka my home for the summer) after a five day trip to Chicago, USA this past week! I went to Lollapalooza, a huge four day music festival in one of the Chicago parks, and it was tiring but fun. 🙂 Has anyone else ever been to a music festival? This was my first one, but hopefully I will go to more as I love music!

100_8760

You know what else I love? Muffins!These rhubarb and berry-filled muffins are a great way to use all the fresh produce here, since it’s the end of raspberry and rhubarb season and the beginning of blueberry season.

Believe it or not, this was the first time I’ve ever used rhubarb. I didn’t even TRY rhubarb until this summer, when my grandma made my family and I a rhubarb crumble. It was very tart- way more so than I was expecting! Because of rhubarb’s tartness, I decided to pair it with sweet (but also sometimes tart) raspberries and blueberries in this recipe. It took a few tries to get the right berries-to-flour ratio, but eventually these muffins were perfected!

I like these muffins because they are fruity, but they have a little zing to them thanks to the fresh ginger and other spices. Give them a try and let me know what you think!

100_8713

Rhuberry Muffins

(Rhubarb Raspberry Blueberry Muffins)

Makes 12 muffins

Ingredients:

  • 2 cups oat flour (to make: process an overflowing 2 cups of oats in a food processor for a minute, or until it turns into a fine flour)
  • 1/4 cup brown sugar
  • 2 tsp baking powder
  • 1 tsp baking soda
  • pinch of salt
  • 1 tsp cinnamon
  • 1 ½ tsp fresh ginger, grated
  • ½ tsp nutmeg
  • 1 tsp vanilla
  • 1 cup applesauce
  • 2 tbsp maple syrup (or 2 more heaping tablespoons of brown sugar)
  • 1/3 cup chopped rhubarb
  • 1/4 an overflowing cup of blueberries
  • 1/4 an overflowing cup of raspberries

For the crumb topping: mix together 1/4 cup rolled oats and 1 tbsp brown sugar, then sprinkle a handful of topping over each muffin before you put the muffins in the oven.

Instructions:

  1. Preheat the oven to 350 degrees F.
  2. Rinse blueberries, raspberries and rhubarb stems.
  3. Peel the outer layer (strings) off of the rhubarb stems, then cut stems it into ½ inch cubes. Now set aside all the fruit.
  4. In a medium-size bowl, whisk together the dry ingredients (flour, sugar, baking powder, baking soda, salt, cinnamon, ginger, and nutmeg).
  5. Add in the wet ingredients (vanilla, applesauce, and maple syrup).
  6. Whisk to combine the wet and dry ingredients.
  7. Fold in the fruits.
  8. Line a muffin tin with muffin liners. Scoop batter into tins so they are 3/4 full.
  9. Sprinkle the crumb topping onto the muffins, if desired. I like it because it adds a nice crunch.
  10. Bake the muffins in the oven for about 20 minutes, or until a toothpick comes out clean when inserted into the center of the muffins.
  11. Let cool for a few minutes, then enjoy! They only last for a few days, so eat them quickly! Or freeze them for later.

Fancy Filled Tomatoes

I love tomatoes. Do you love tomatoes? If so, this recipe is for you!

IMG_2074

It starts with fresh tomatoes, bursting with flavorful juices. These tomatoes are then filled to the brim with a hearty quinoa mixture and topped with an agave-sweetened balsamic dressing. What’s not to love?

I get my tomatoes from a local greenhouse called TLC. They grow their produce hydroponically, which means plants are grown in mineral solution with water instead of in dirt. My mom and I go to TLC at least once a week, and a few weeks ago my mom found out they needed help harvesting tomatoes.

IMG_0945

So…. guess what?! I’m working in TLC’s hydroponic greenhouse harvesting tomatoes!! I work Monday and Thursday from 9-3 picking beefsteak, orange wellington, and cherry tomatoes. Four other girls and I pick 300+ pounds of tomatoes each time I’m there! Do any of you have a “summer” job?

I get a lot of tomatoes working at TLC, and I’ve mostly just been eating them plain. However, sometimes I’ve been getting fancy with my food and making dishes where tomato is the star ingredient, like in this dish.

Please HMU with tomato recipes though because I have so many tomatoes.

Look at all these ripe tomatoes at TLC. The red ones are beefsteaks and the orange ones are called orange wellingtons- they’re sweeter than most other tomatoes. 

Back to this dish. It’s super fancy, fresh, and yummo… so you should try it. Honestly, why not!? My favorite part of making this dish is scooping out the tomatoes and eating their entrails (guts? Insides? There’s no good word to use). I also like plating the dish. Serve it to someone you’re trying to impress, as it’s easy to make but it looks fancy-schmancy.

Go use ALL the fresh tomatoes and make this quinoa-filled tomato bowl. Then enjoy it.

xx Ellie

Screen Shot 2016-07-17 at 3.17.12 PM

Fancy Filled Tomatoes

Serves 6 (1 serving = 1 filled tomato)

Quinoa Filling (adapted from this recipe)

  • 3/4 cup uncooked quinoa
  • 1 tablespoon oil (I like olive oil)
  • ½ a large onion, sliced
  • 4 garlic cloves, minced
  • 1 teaspoon ginger, minced
  • a pinch of salt
  • a pinch of pepper
  • 1 and 3/4 cup veggie broth
  • 2-3 tablespoons freshly chopped parsley
  • 1 15 ounce can chickpeas
  1. Soak the quinoa for about 30 minutes.
  2. Heat the oil in a medium saucepan over medium-high heat. Add in the onion and sauté it until it’s brown (about 4 minutes).
  3. Add the garlic, ginger, salt, and pepper to the pan with the onion and sauté for about 30 seconds.
  4. Add in the quinoa, and stir everything around.
  5. Add in the veggie broth and bring the mixture to a boil.
  6. Once the mixture is at a boil, cover it with a lid and let it simmer for about 20 minutes, or until the quinoa is soft and you can’t see broth.
  7. Drain the chickpeas from the can.
  8. Add the chickpeas and parsley to the quinoa mixture. Your filling is complete!

White Balsamic Dressing

  • ½ cup olive oil
  • 1/4 cup white balsamic vinegar
  • 2 tablespoons agave
  • ½ teaspoon salt
  • ½ teaspoon pepper
  1. Vigorously whisk all the ingredients together in a small bowl until they’re combined.

To assemble the dish:

  • 6 big tomatoes
  • quinoa filling (recipe above)
  • balsamic dressing (recipe above)
  1. Cut the tops of each tomato off (like in the pictures). With a spoon, scoop out the insides of the tomatoes and discard (by eating them right away or by saving them to put on salads).
  2. Spoon the quinoa filling into the tomato “bowls” and plate them.
  3. Drizzle some balsamic dressing onto the filled tomato bowls.
  4. Garnish your filled tomatoes with more dressing, tomato slices, more fresh parsley and pepper. ENJOY!

Festive Fourth of July Cake

Hi friends! I meant to post this recipe a few days ago, but I’ve had computer troubles the last week and a half so I’ve been unable to post. Everything is hunky dory now though. 🙂

Especially because of this festive American flag-shaped Fourth of July cake. 

IMG_1735IMG_1591

This cake is the perfect “I LOVE THE UNITED STATES OF AMERICA” recipe. It’s shaped like a circle, like the shape of the earth as well as like a symbol for inclusiveness (everyone is in the circle + the circle never ends and neither does love). The inside looks like an American flag- it has the blue “stars” layer and the red and white “stripes” layers. It also takes advantage of American produce- fresh, local strawberries that I picked with my own two hands (I’ve got that industrial spirit!) and fresh blueberries. ALSO, it’s cake, and what American doesn’t like sweets!?

Anyway. This cake is pretty festive and fabulous if I do say so myself (a weird phrase). It came about because I wanted to make something special for fourth of July that also took advantage of all the strawberries my mom and I picked at our local strawberry patch.

Enter this cake.

I found out how to make an American flag cake from Food 52 (here’s the link). The recipe, as well as others I looked up, were not vegan… so I decided to make up my very own vegan version of the fancy flag cake and frosting! I used fresh fruit as coloring instead of food coloring because I think food coloring is gross. What the heck is in it!??! I don’t want those creepy chemicals going into my body!

Strawberries make up the red layer and blueberries make up the blue layer. I used Food 52’s instructions to assemble the cake. Unlike Food 52, I’m including pictures in my recipe as I’m a visual learner so I find pictures extremely helpful.

IMG_1623

I won’t ramble on for too much longer, other than to say that 1) this cake took me a long time to make, but it was worth it for the delight of eating it as well as for the compliments I got on it, and 2) this cake is really good and you should definitely make it for your next patriotic celebration (Labor Day??). Don’t be intimidated by the size- you CAN do it.

I hope you love this cake. My family and I ate it for dessert of dinner on the Fourth and enjoyed it immensely- our favorite layer was the blueberry one. Please let me know if you try this recipe. Send me a picture via email (peanutbutterandle@gmail.com) or tag me in a picture on Instagram so I can see your wonderful creation!

FullSizeRender

American Flag Cake

makes 1 HUGE 5-layer cake that serves around 24-32 people

(depending on how large your pieces are- it serves 32 if you cut the cake into 1/4 inch pieces)

*JUST SO YOU KNOW: This cake takes a while to make. Like 3 hours or more. You can always spread the baking and assembling out over the course of 2 days, like I did! The cake stays fresh as long as you wrap it up. I just thought I’d warn you!

For the STRAWBERRY cake

(makes 2 8-inch round layers)

Dry Ingredients:

  • 3 + ½ cups of flour (all-purpose is best)
  • 2 cups of sugar
  • 2 teaspoons baking soda
  • 1 teaspoon salt

Wet Ingredients:

  • 2/3 cup vegetable or canola oil
  • 2 tablespoons vinegar (white)
  • 1 tablespoon pure vanilla extract
  • 1 cup non-dairy milk (I like almond)
  • 1 cup strawberry puree- process an overflowing 1 ½ cups of washed and stemmed berries in the food processor until it’s a liquid puree- it takes about a minute of processing.
  • Feel free to add some red food coloring here to amp up the red color of this cake.

Instructions-

  1. Preheat the oven to 350 degrees F.
  2. Measure and whisk together the dry ingredients in a large bowl.
  3. In a separate bowl, measure and whisk together the liquid ingredients EXCEPT the strawberry puree in a medium-sized bowl.
  4. Add the wet ingredients into the bowl with the dry ingredients.
  5. Mix the wet ingredients together until just combined.
  6. Make the strawberry puree, then measure it out and add it into the batter. Whisk it in until the batter is entirely pink!
  7. Oil the bottoms of 2 8-inch cake rounds. Pour batter into the pans until each pan is 3/4 of the way full with batter. Use all the batter!
  8. Bake the cakes for 35-38 minutes, 0r until a toothpick comes out clean when inserted into the cake.
  9. Let cool.

s

For the VANILLA cake 

(makes 2 8-inch round layers)

Dry Ingredients:

  • 3 + ½ cups flour
  • 2 cups sugar
  • 2 teaspoons baking soda
  • 1 teaspoon salt

Wet Ingredients:

  • 2/3 cup vegetable/ canola oil
  • 2 tablespoons vinegar
  • 2 tablespoons pure vanilla extract
  • 2 cups nondairy milk

Instructions-

  1. Preheat the oven to 350 degrees F.
  2. Measure and whisk together the dry ingredients in a large bowl.
  3. In a separate bowl, measure and whisk together the liquid ingredients in a medium-sized bowl.
  4. Add the wet ingredients into the bowl with the dry ingredients.
  5. Mix the wet ingredients together until just combined.
  6. Oil the bottoms of 2 8-inch cake rounds. Pour batter into the pans until each pan is 3/4 of the way full with batter. Use all the batter!
  7. Bake the cakes for 35-38 minutes, 0r until a toothpick comes out clean when inserted into the cake.
  8. Let cool.

FullSizeRender

For the BLUEBERRY Cake

(makes 1 8-inch round)

Wet Ingredients:

  • 1 + 3/4 cups flour
  • 1 cup sugar
  • 1 teaspoon baking soda
  • ½ teaspoon salt

Dry Ingredients:

  • 1/3 cup vegetable/ canola oil
  • 1 tablespoon vinegar (white)
  • 1 + ½ teaspoons pure vanilla extract
  • ½ cup nondairy milk
  • ½ cup blueberry puree: process an overflowing 3/4 cup of washed and stemmed blueberries in the food processor until it’s a liquid puree- it takes about a minute of processing.
  • Feel free to add some blue food coloring here to amp up the blue color of this cake.

Instructions-

  1. Preheat the oven to 350 degrees F.
  2. Measure and whisk together the dry ingredients in a large bowl.
  3. In a separate bowl, measure and whisk together the liquid ingredients EXCEPT the blueberry puree in a medium-sized bowl.
  4. Add the wet ingredients into the bowl with the dry ingredients.
  5. Mix the wet ingredients together until just combined.
  6. Make the blueberry puree, then measure it out and add it into the batter. Whisk it in until the batter is entirely blue!
  7. Oil the bottom of a 8-inch cake round. Pour batter into the pan until it is 3/4 of the way full with batter. Use all the batter!
  8. Bake the cake for 35-38 minutes, 0r until a toothpick comes out clean when inserted into the cake.
  9. Let cool.

IMG_1638Buttercream Frosting Recipe

  1. Measure out the vegan butter into a large bowl or a stand mixer (the best option).
  2. Beat the butter until it’s soft and spreadable (medium speed). Use a hand mixer or a stand mixer if you have one.
  3. Add in the powdered sugar, one cup at a time. Stir on low speed until the sugar is incorporated.
  4. The frosting should be clumpy- add in the vanilla and nondairy milk to thin it!
  5. Beat the frosting until it’s a thin and spreadable consistency. Frost the cake(s) with it!

IMG_1736

TO ASSEMBLE THE FULL CAKE (WITH PICTURES):

  1. Cut the dome top off all of the cakes. PLEASE keep them- you’ll need them later! I used a bread knife to do this, and just cut off the uneven top “dome” layer of the cake so the cake would lie flat. Put the dome tops on another plate or something for now.
  2. Place one strawberry round on a big plate (preferably the plate you plan to serve the cake on). This is layer one.
  3. Spoon frosting onto the top of the cake and spread it around until the cake top is covered.
  4. Place one vanilla round on top of the frosted strawberry round. This is layer two.
  5. Frost the top of the vanilla round.
  6. Place the second strawberry round on top of the frosted vanilla round. This is layer three.
  7. Frost the top of the second strawberry round.
  8. Place the second vanilla round on top of the frosted second strawberry round. This is layer four.
  9. Frost the top of the second vanilla round.
  10. Place the flat blueberry round on a separate plate. Using a bowl or another sort of template (about 4 inches in diameter), cut out the center of the blueberry round. Set the center aside (or eat it) as you won’t need it anymore.
  11. On a separate plate, take the strawberry round top “dome” and cut out the center of it with the same template you used on the blueberry round. KEEP the CENTER of the round (what you cut out), and discard the outside ring (or eat it) since you won’t need it anymore. Cut the center round in half, so it is half the height of the blueberry flat round.
  12. Place the O-shaped blueberry round on top of the frosted vanilla fourth-layer round.
  13. Place the baby strawberry round inside the O-shaped blueberry round. Stick it on top of the frosting covering the vanilla fourth layer.
  14. Frost the top of the baby strawberry layer.
  15. On a separate plate, take the vanilla round top “dome” and cut out the center of it with the same template you used on the blueberry and strawberry rounds. KEEP the CENTER of the round (what you cut out), and discard the outside ring (or eat it) since you won’t need it anymore. Cut the center round in half, so it is half the height of the blueberry flat round.
  16. Place the baby vanilla layer on top of the baby strawberry layer inside of the big O-shaped blueberry layer.
  17. Frost the entire cake. Dump frosting on to the top of the cake and frost from there. It doesn’t have to look perfect- mine sure doesn’t!
  18. Top the frosted cake with washed blueberries and strawberries. You can be extra patriotic and put the blueberries and strawberries in the shape of the American flag on top of the cake (with the blueberries as the stars and the strawberries as stripes).
  19. SERVE AND ENJOY YOUR PATRIOTIC CAKE!

cake6and1

cake6and2

Steps 2-16

cakee

Steps 10-13

IMG_1737

Steps 17-19

I hope you had the best holiday weekend ever!!

I hung out with my friends and family, went to the beach, went swimming, read and relaxed, watched the fireworks, and had a nice dinner with my family. What did you do? And what did you eat?! 🙂

xx Ellie

vegancake

Year-round Carrot Soup

Carrots aren’t just side dish components anymore! They takes center stage in this velvety carrot soup.

100_8437I have always loved carrots. Probably more than I should.

The addiction started at a young age, when my mom made us eat some baby carrots with our dinner. Sometimes we’d have to eat our age in carrots, so when I was eight I had to eat eight baby carrots. The addiction wasn’t too bad back then. However, fast forward a few years and I was all about the healthy snacks. Enter carrots and hummus. You could find me in the kitchen after school, chowing down on an entire bag of carrots and some hummus. Yup, an entire bag of baby carrots. They’re small, convenient, low-calorie, and full of nutrients! Washed, peeled, straight-from-the-bag baby carrots are kind of my chip replacement since they are just as convenient as chips but much healthier.

Actually, I eat SO MANY carrots that the bottoms of my feet are ORANGE, and my hands have an orange hue! It’s because carrots contain so much beta carotene, an orange pigment (more info about that here if you’re curious).

We were talking about beta carotene in my anatomy class this past fall and my teacher challenged us to eat so much pumpkin (in pie) during Thanksgiving that we’d turn orange. I raised my hand and was like, “I’m already orange.” Then I whipped off my boots and showed the class the bottoms of my feet. An awkward moment for Ellie, but whatevs. People thought it was cool. I think it’s pretty rad too. 😉100_8392I’ve also been eating carrot baked goods (like these peanut butter carrot muffins) as well as carrot dishes for dinner for a while. One of my favorite carrot dishes? This carrot soup. 

My mom has been making this soup ever since I can remember. It’s super easy to make, plus it feeds the family for a few days- and who doesn’t love leftovers!?

100_8452

Basically, I love carrots and therefore I love this soup. Even if you don’t like carrots, you’ll probably like this soup because of the other flavors in it, like onion and pepper. Make it a meal with a side salad, some quinoa, or a big slice (or two) of rustic, artisan bread (like this one which is in the picture). This soup is a great way to take advantage of the upcoming carrot season. I know I’ll be making this soup in a few weeks when the carrots in my garden are ready!

Give this pretty simple soup a try and let me know what you think!

Carrot Soup

vegan, gluten-free, low-calorie

Serves 8

  • 2-3 Tbsp olive oil
  • 2 pounds carrots, peeled and loosely chopped (no need to wash, peel, or chop baby carrots though)
  • 1 medium onion, chopped
  • 1 large potato, peeled and diced
  • ½ teaspoon salt’
  • pepper to taste
  • 1 teaspoon sugar
  • 6 cups vegetable broth
  • fresh herbs, such as parsley, to serve (I used cilantro since it was the only fresh herb I had on hand)

Heat oil in a large saucepan and add in carrots, onion, and potato. Sauté for several minutes. Season with salt and pepper, then add in the sugar. Cover and cook over low heat for 15 minutes. Add veggie broth and bring the pot to a boil. Then, lower the heat and let the pot simmer for another 15 minutes. Puree the soup in a blender until smooth. I used my Vitamix, but a “regular” (not high speed) blender works too! Serve the soup right away- pour it into bowls and garnish with herbs and more salt and pepper (if desired). The rest of the soup can be poured in an airtight container and stored in the fridge for the next few days. Reheated, it’s a perfect quick and nutritious lunch or dinner!

Stay warm and have a great day!

xx Ellie

Chocolate Peanut Butter Donuts

Guess what today is!?

The first Thursday of the month!

Guess what that means!?

It’s time for the monthly Peanut Butter Bash” hosted by Miranda of Cookie Dough and Oven Mitt.

donuts

I decided to make mini peanut butter donuts with yogurt, our challenge ingredient for June, because I love donuts and haven’t made them for a while. Plus, mini donuts? SO fun! And you get to eat more of them… 😉

100_8250


Coincidentally, Miranda decided to make peanut butter-filled (chocolate glazed) donuts about a week before me, AND one of the other lovely peanut butter bash ladies ALSO made peanut butter donuts! I guess donuts, peanut butter, and yogurt just go reaaaaaallllly well together. 😉

Now I’m going to leave you with some mouthwatering pictures and the recipe because you have donuts to make and I have a state tennis tournament to go play doubles in! Wish my team and I luck as we try to win a high school state championship for girls tennis!

Chocolate Peanut Butter Donuts

makes about 24 mini donuts/ doughnuts

Regular dairy yogurt and milk should work in this recipe, but I can’t guarantee it as I haven’t tried it. I prefer to bake vegan food since I’m vegan! 

For the Donuts:

  • 1/3 cup peanut butter
  • 1/3 cup vegan yogurt (I used one container of vegan Almond Dream yogurt that I found at my local grocery store, D&W)
  • 1/3 cup white sugar
  • 1/3 cup nondairy milk (I used almond milk but regular milk should also work here)
  • 1 teaspoon vanilla
  • 1 cup flour
  • 1 tsp baking powder
  • 1/4 tsp salt

For the Chocolatey Glaze:

  • peanut (or cashew) pieces to top the donuts with

To make the donuts: Preheat your oven to 350 degrees F. Add the peanut butter, yogurt, sugar, milk, and vanilla into a stand mixer. Start out at a slow speed (2 or 4) to mix everything together, then when it comes together beat the mixture on high for about a minute, or until it’s light in color and creamy. Add in the other ingredients (flour, baking powder, salt), and mix everything at a low speed until just combined.**

** You can do all this by hand, but a stand mixer makes the mixing process 100 times easier! 

IMG_9876

Grease your mini donut pan (I used cooking spray). Spoon the mixture into the donut molds. You’ll need about a VERY large and full spoonful for each donut.

Bake the donuts for 6-7 minutes, or until they’re golden and fluffy.

To make the glaze: combine the chocolate chips and milk into a small bowl and microwave on high for 30 seconds or until the chocolate is mostly melted. Stir the mixture with a knife or spoon to smooth it out. You might need to add a teaspoon or so more of milk if the mixture is clumpy and thick. You want it to be like a glaze- sort of like a ganache.

To assemble: dip the tops of the donuts into the chocolate filled bowl and twirl them around so the whole top of the donut is coated with chocolate. Sprinkle the top with crushed peanut or cashew pieces if desired for a pretty donut with a crunch.

Screen Shot 2016-06-01 at 10.24.05 PM

Check out the two other peanut butter yogurt recipes! Click the links below. 

Peanut Butter Brownie Dip from Gina of Kleinworth & Co.

Vegan Yogurt Peanut Butter Donuts from Emma of BakeThenEat

Have a lovely weekend! Eat lots of peanut butter!

xx Ellie